CI/CD using Docker, TravisCI and Elastic beanstalk
Prelude
CI/CD stands for ‘continuous integration and continuous deployment’. This part of development is very crucial and important. Imagine for every time when your team’s software is built, you have to.. wait, no. Imagine the following steps in order. The premise is that you want to deploy the latest version of your team’s software product for testing on various conditions.
- Pull from VCS(github, gitlab, perforce or wherever), build the code.
- Create various VMs (different version of Windows, different RDBMS, varying specs of hardware ..etc) for test.
- Copy & paste the ouput from build to each prepared VMs.
- Run the software in each VM.
- Repeat 1~4 WHENEVER there is a new release to be tested.
The thing is, I didn’t have to imagine it, because I DID IT!!… It was a sheer time-consuming job, of deleting and creating VMs, of installing and uninstalling softwares, of fetching and building the code from repositories. I have been doing such a tedious job for one whole year, because that was how the team has been working (still ongoig, surprisingly). Establishing an elastic and all-encompassing CI/CD pipeline can greatly decrease the amount of time in doing repeated works, and can also reduce lots of human errors inevitably involved in the process of deployment.
In this posting, I will review a udemy course I’ve been taking - a course on Docker and Kubernetes by Stephen Grider(truly a remarkable guy). The actual project that undergoes CI/CD.
1. Goal of this posting
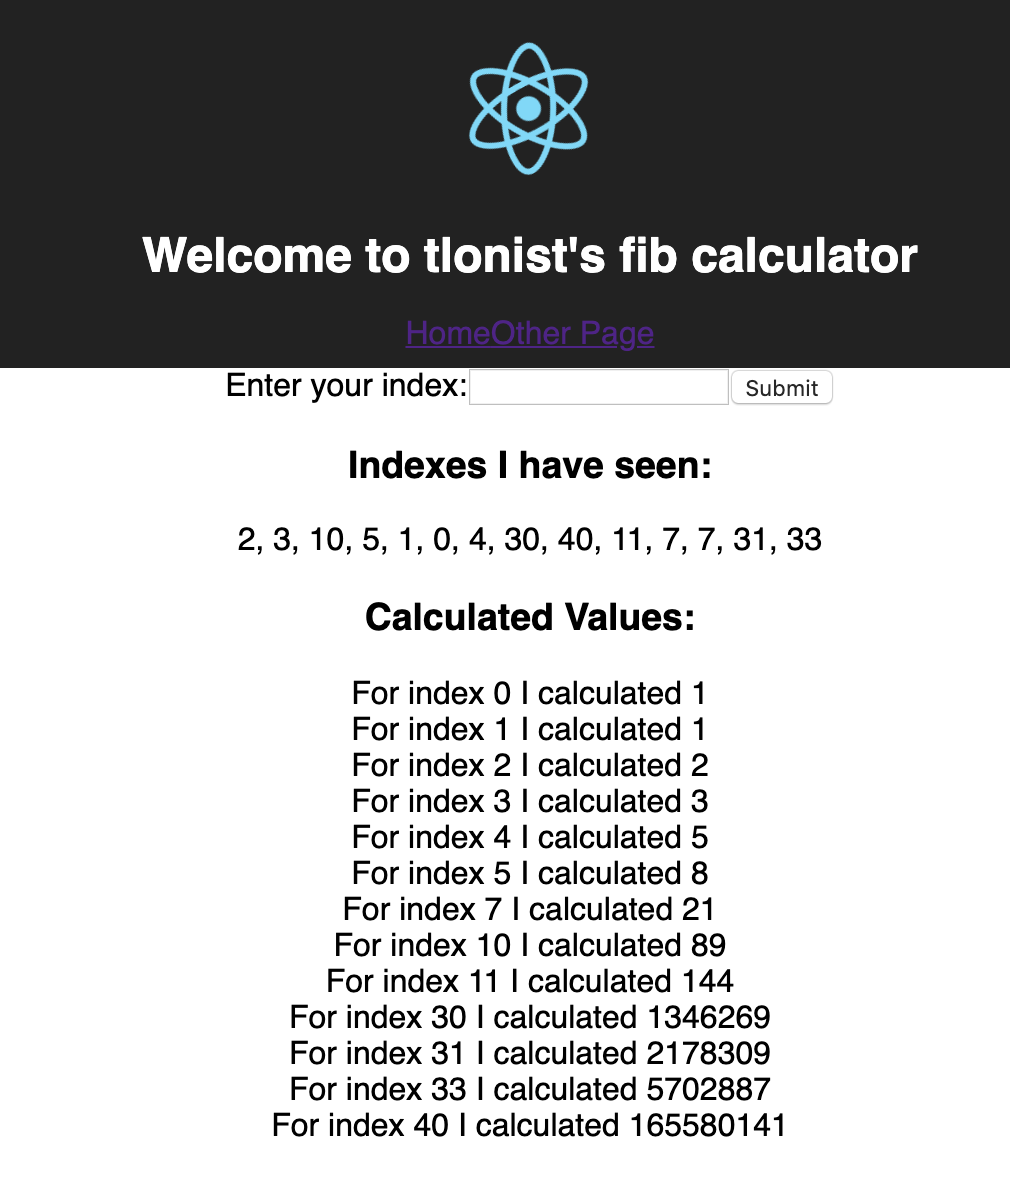
- The goal is to trace every step of procedures that were taken in implementing a CI/CD of the Fibonacci calculator application. At the end of the day, something like below will happen.
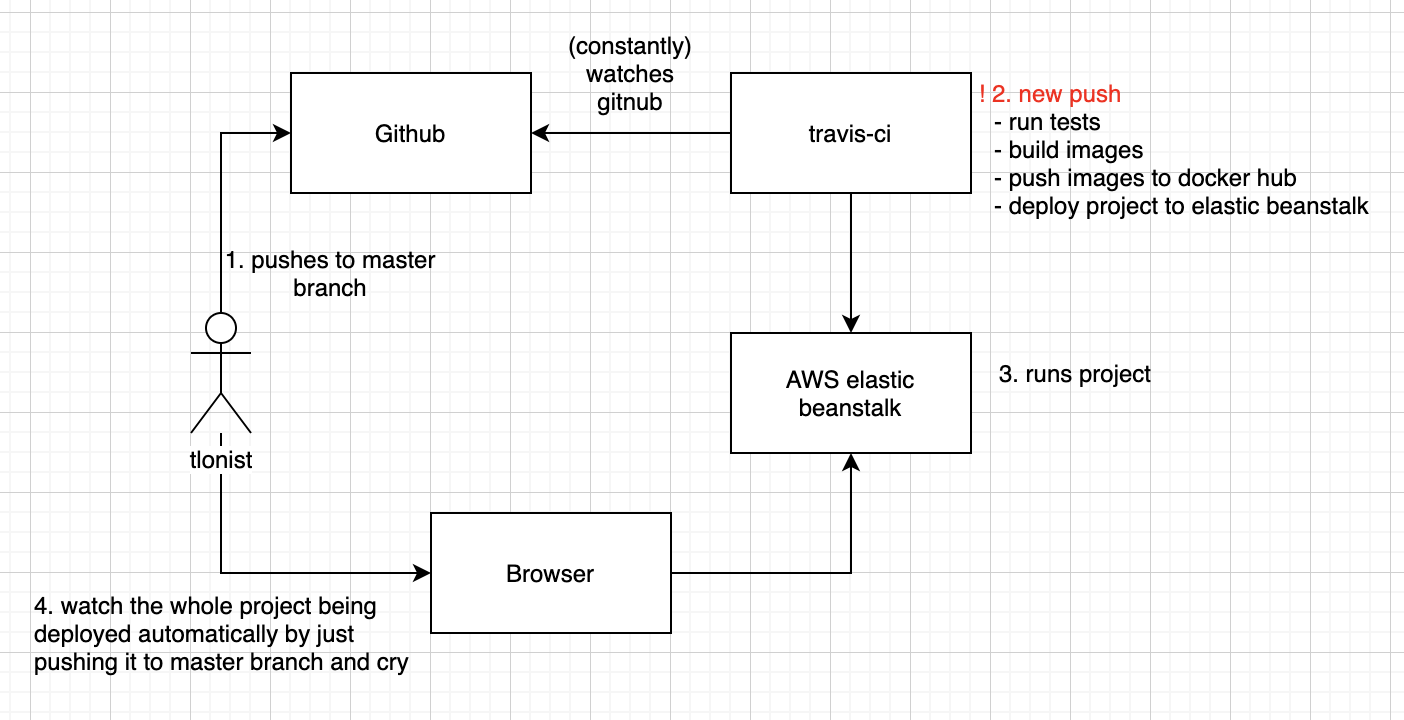
- Simply put, by just pushing a new commit to the master branch, the whole application will be tested, built, pushed to Docker hub, and deployed to AWS server. In short, the aforementioned process 1~5 is just completely gone. (Of course not exactly, but can be made done).
2. Technology Stack
- node.js (backend)
- react.js (frontend)
- nginx
- redis
- postgres
- Docker
- DockerCompose
- TravisCI
- AWS elastic beanstalk
- AWS ElastiCache (redis)
- AWS RDS (postgres)
3. Blueprint of sample project
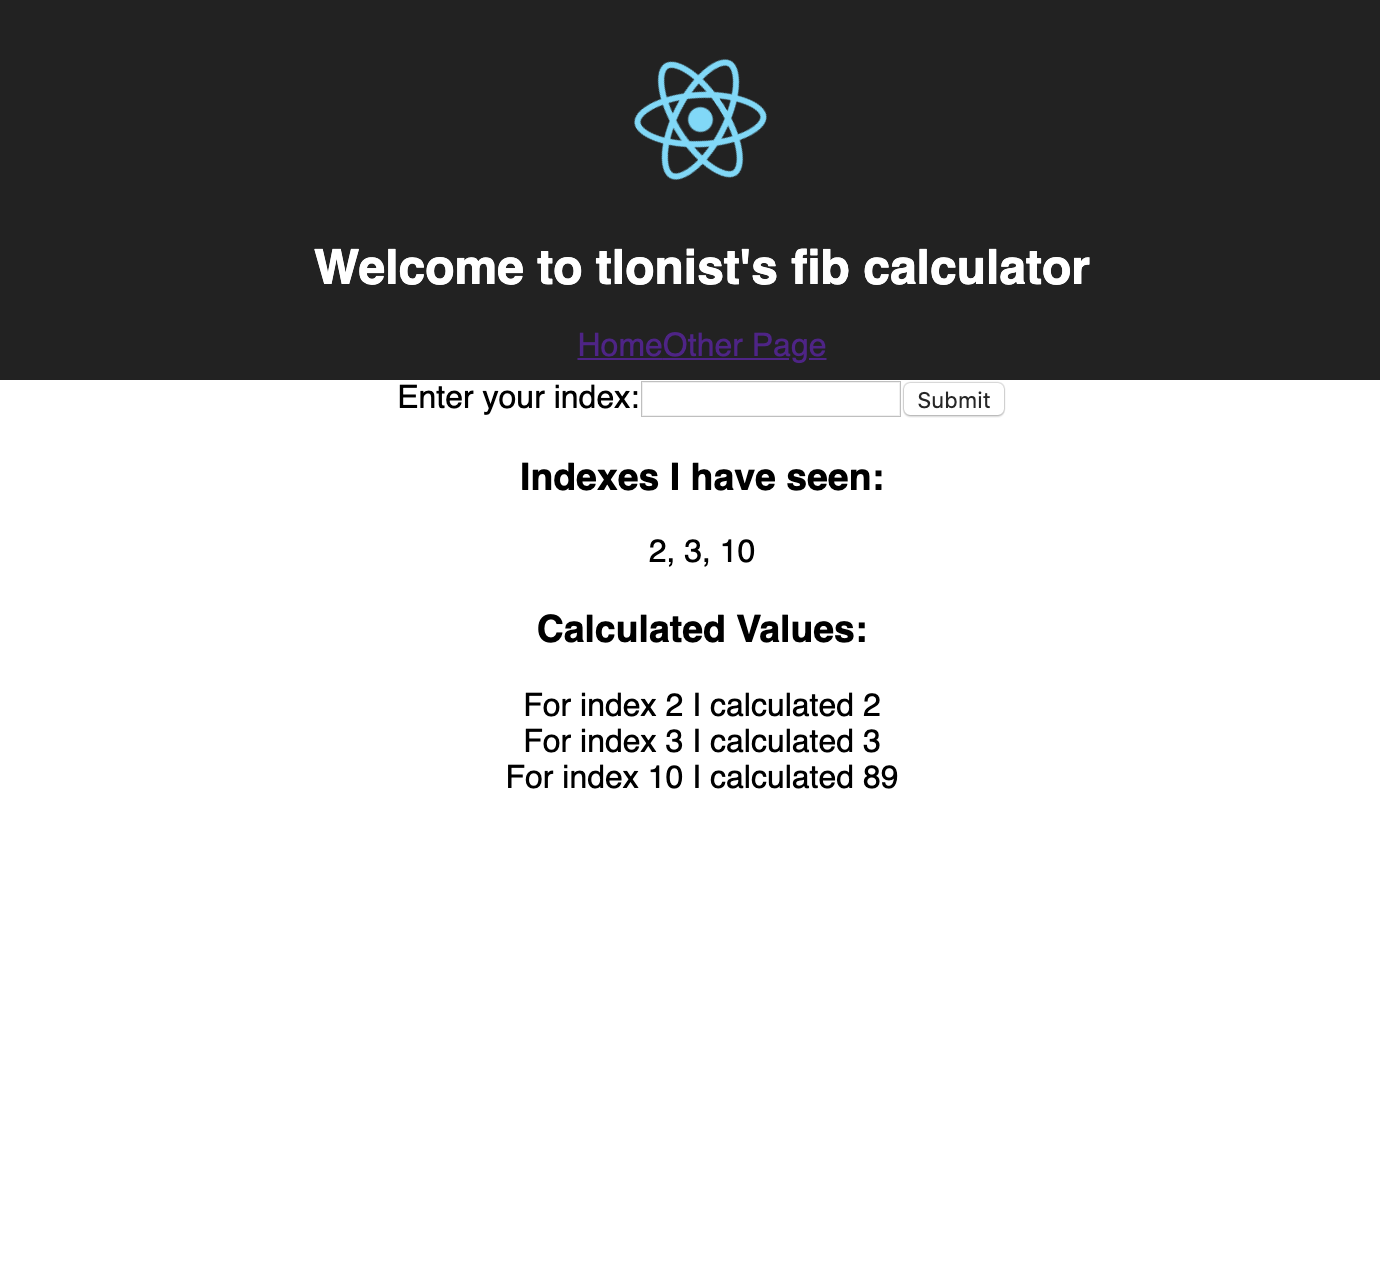
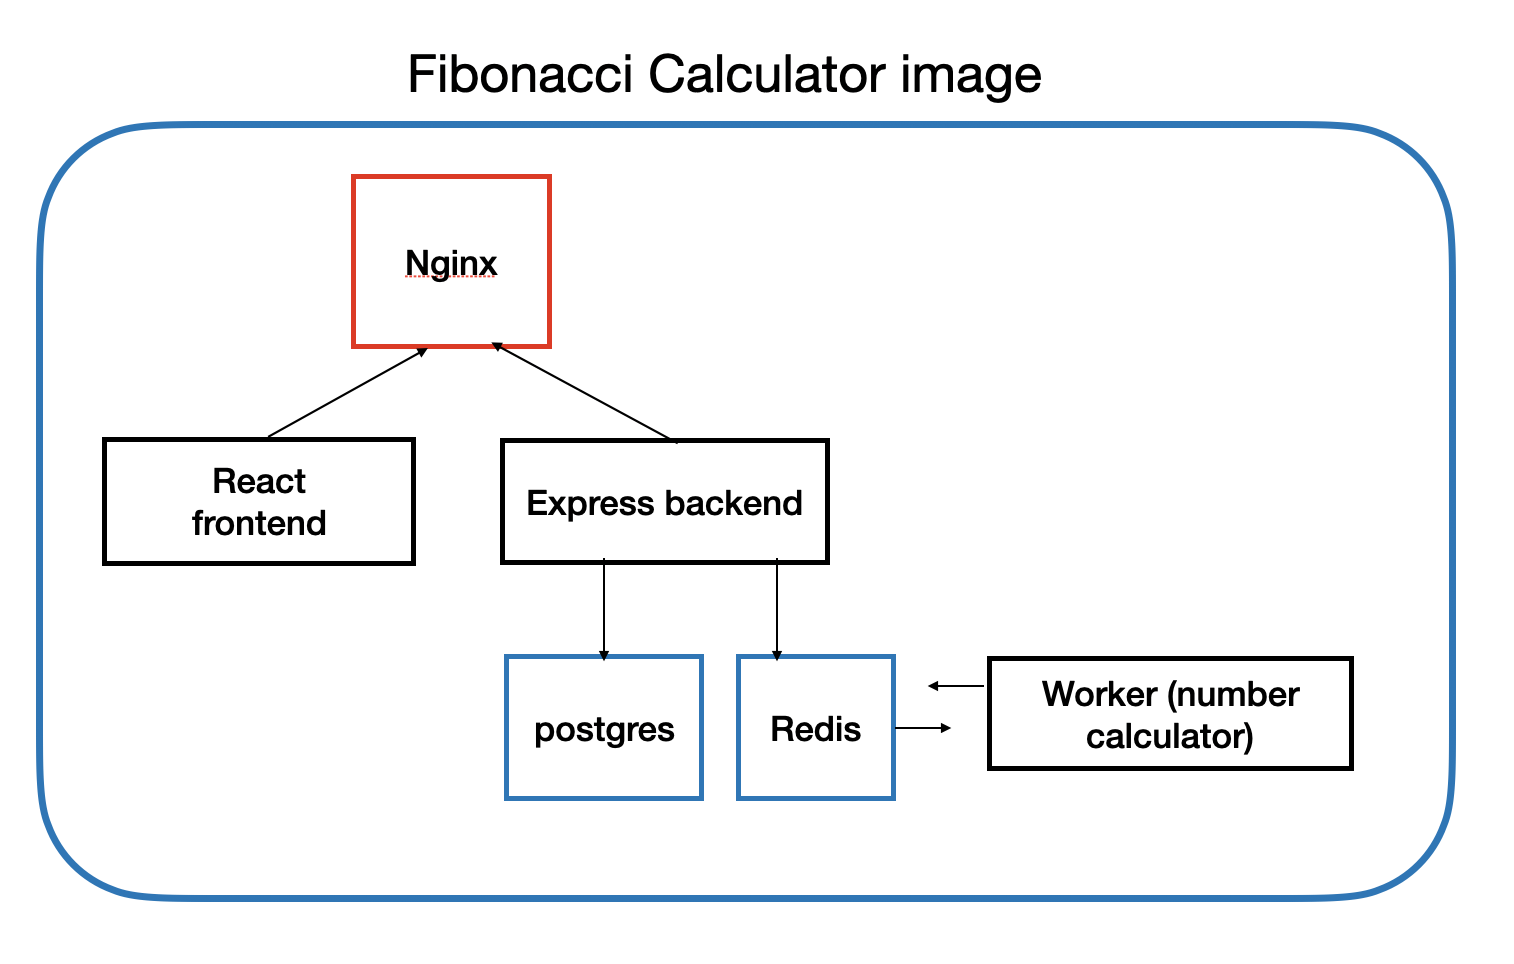
- The project that I’m building is a simple Fibonacci number calculator. It receives an index as an input from the user, and shows the Fibonacci number that corresponds to the user’s index.
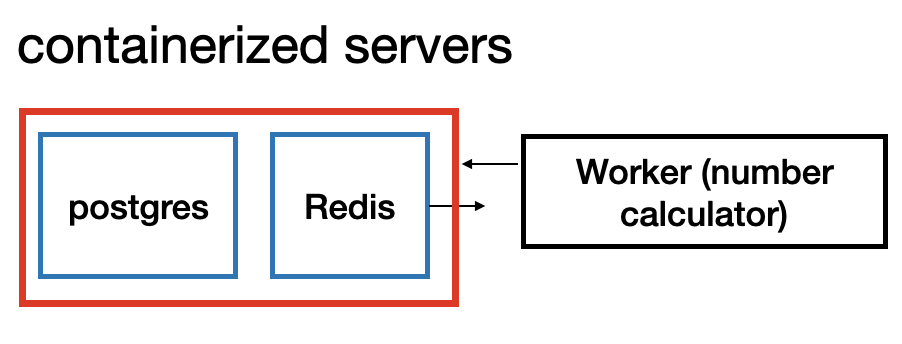
- The overall structure of the project is intentionally inefficient, because it makes use of unnecessary database and cache just to demonstrate how can multiple containers cooperate to work with one another. Below is the overall structure.
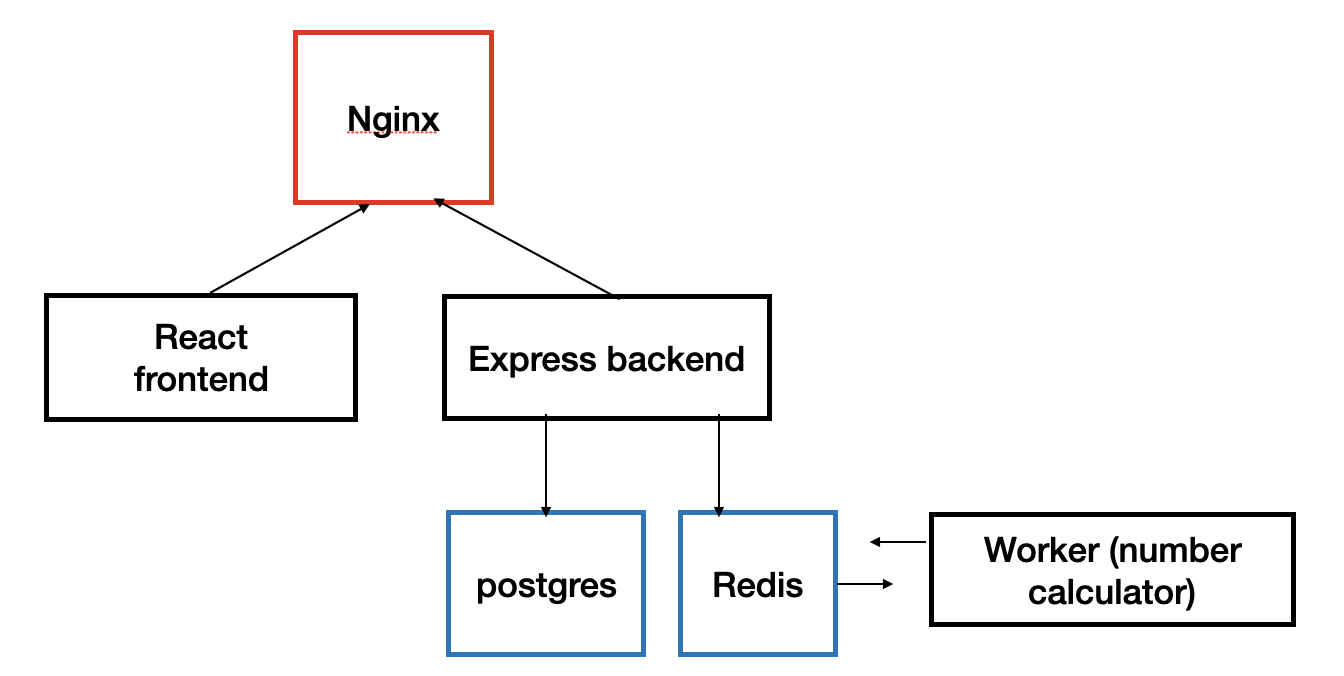
- nginx(crucial): Configures ports for frontend & backend, routes user requests to appropriate urls.
- frontend (react): provides users an interface. Receives user input, calls backend for computation, shows the result on browser.
- backend (express): receives requests from frontend, calls worker for computation, save the values to postgres database.
- worker: computes index tossed from backend, save it in redis.
- redis: save computed index value.
- postgres: saved a list of computed index values in database.
- The whole project code is in tlonist github.
4. Background knowledge
For my own benefit, I have gone through some reviews of key concepts and explanation of tools used in this project.
4-1. What is Docker? What is a container?
- A container is a standard unit of software that packages up code and all of its dependencies so that the application can run quickly and reliably from one computing environment to another. This beatiful explanation is straight from the docker homepage. From time to time, or quite often, there are lots of things to consider when installing a software(especially it is a b2b solution)
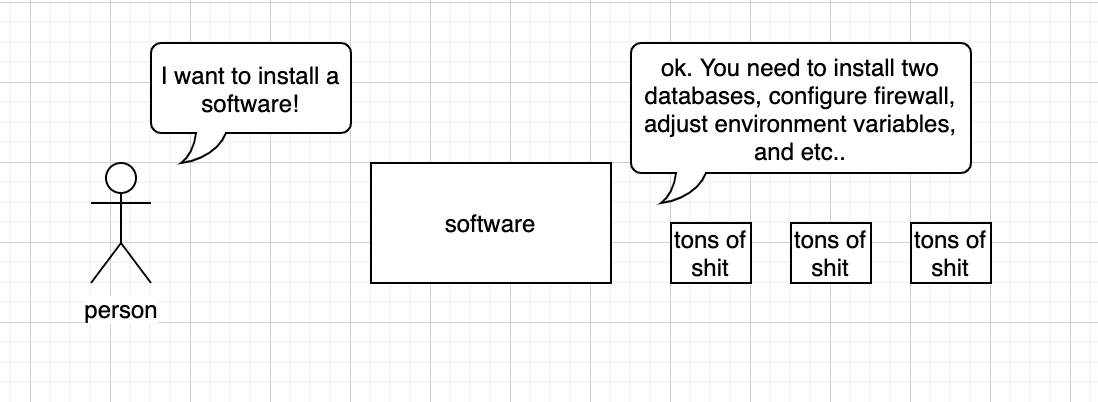 The requirement may differ by OS, databases user wants to use, or specific network condition of the environment.
Docker containner image provides a lightweight, standalone, executable software package that includes everything that is needed to run the application including, code, runtime, systemtools, system libraries and settings.

It can run regardlesso of the types of OS; it is lightweight, because it does not require OS per application, sharing existing OS system’s kernel.
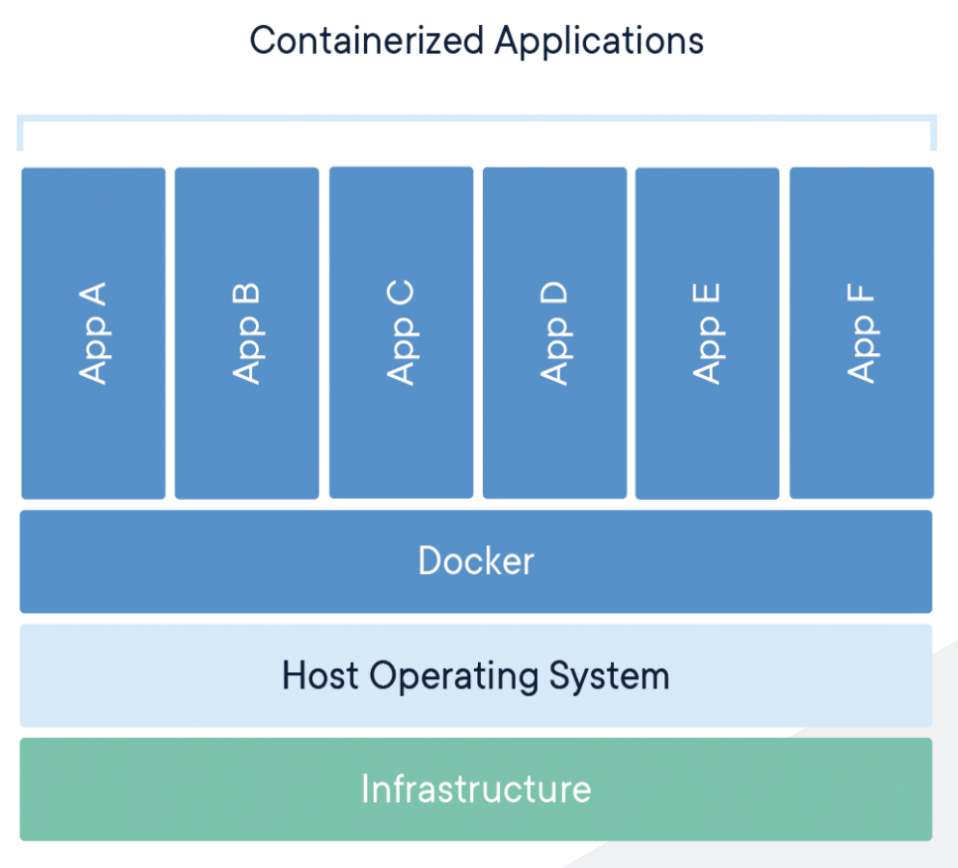
4-2. Differenc between containers and virtual machines
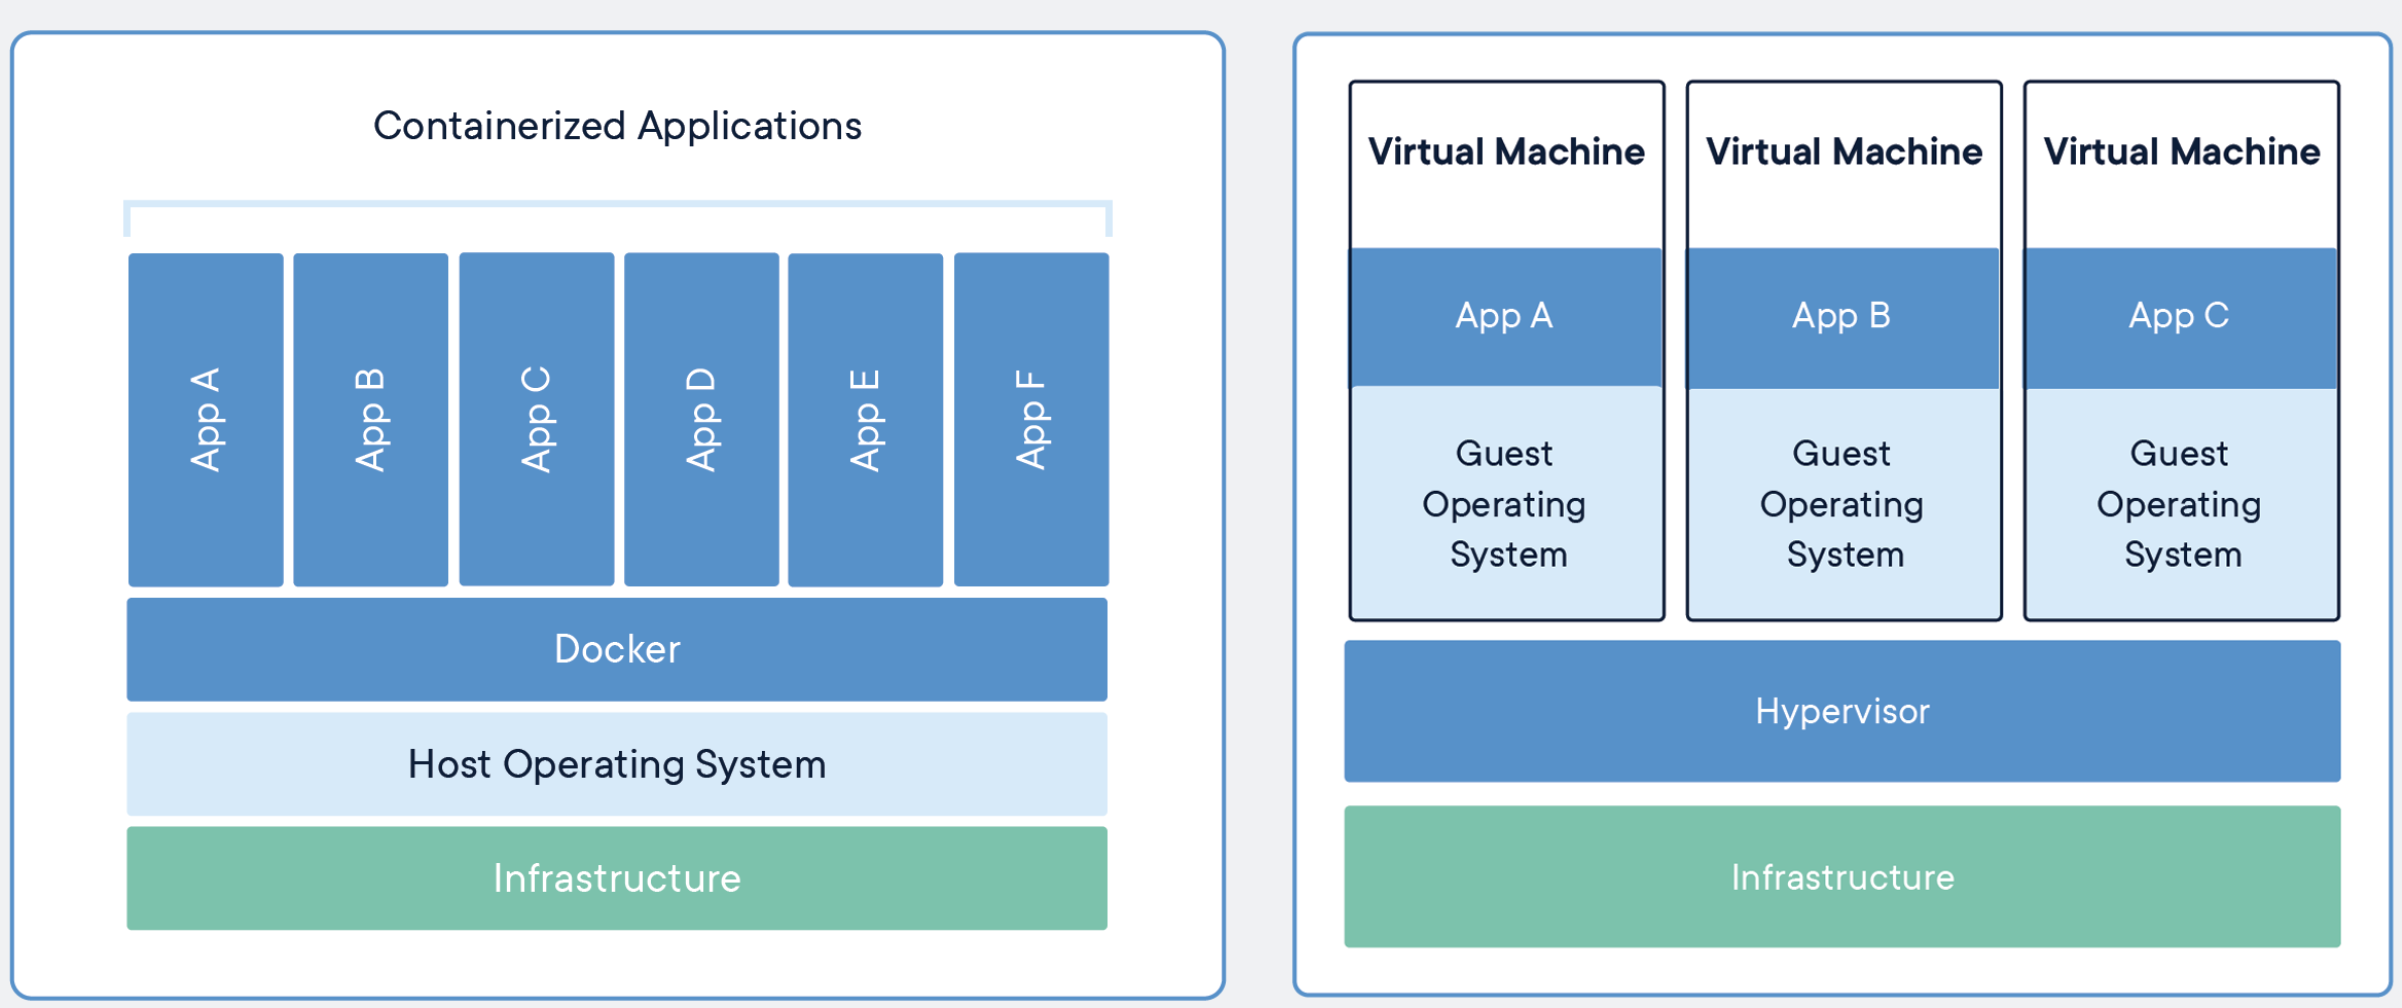
- Containers:
- app layer abstraction
- multiple containers share same hardware resources
- takes up less space and lightweight in size.
- Virutal Machines:
- physical layer abstraction
- requires separate OS for each. cannot share resources
- heavy and slow in booting
4-3. Fibonacci Calculator into a docker image!
- So if I have a docker image of my project, I don’t need to worry about testing, building, copying the application. Instead, just downloading and executing a well made docker-image will do! Instead of making a big chunk of a whole project, I will divide the containers by servers, so that I can each containers serve a unique purpose. These containers can then be configured and assembled to make
- In addition to making an image, for production purpose, I can make it easily downloadable by uploading the images to docker hub. link. Then these images will be available anytime, anywhere.
4-4. What is travis CI and what does it do?
- Travis CI, as the name suggests, is a CI tool. In other words, it tests and build the application, using the source code uploaded in Github. It reads a configuration file called .travis.yaml for executing a set of tests and build process.
4-5. What does elastic beanstalk do?
- When I think about using AWS, I normally think about making an EC2 instance, and uploading a bunch of applications together with my own application for running. This process can be a little tedious and time consuming, especially when there are a lot of other works related to the application are piled up.
- With elastic beanstalk service, all I need to do is uploading my application straight into the aws cloud, and the application will be load-balanced, scaled, and monitored at the mercy of the elastic beanstalk service. This is the Continuous Deployment part of the CI/CD chain.
5. Implementation
- So here is what needs to be done in overall process. The highlited ones will be discussed in details.
- Precondition: Docker for OS installed. AWS account, Github accout, travis-ci account
- Create the project. Write all the codes necessary for the Fibonacci application to work.
- Create a github repository for the project.
- Create a travis-ci account. Sync it to the github repository I created.
- Make dockerfiles for each servers (nginx, react client, express server, worker server)
- Make .travis.yml file for travis configuration. (Continuous Integration)
- Configure AWS services. (Continuous Deployment)
- Make Dockerrun.aws.json file for elastic beanstalk configuration.
- Push all the codes to github master branch.
Alright, let’s get started.
5-1. Making Docker files for individual containers
Let’s make dockerfiles for creating containers for each services.
Dockerfile for React Client (frontend)
Below is the dockerfile for react client and explanation
FROM node:alpine as builder
# use node:alpine as a default container for react server

WORKDIR '/app'
# since dockerized container has its own file system, set the working directory to be /app

COPY ./package.json ./
# copy package.json to root

RUN npm install
# install with package.json

COPY . .
# copy everything fetched from npm to the container

RUN npm run build

FROM nginx
EXPOSE 3000
# port 3000 exposed

COPY ./nginx/default.conf /etc/nginx/conf.d/default.conf
#copy nginx config file to docker

COPY --from=builder /app/build /usr/share/nginx/html
#copy the output of build to nginx/html for nginx to serve
server {
    listen 3000;

    location / {
        root /usr/share/nginx/html;
        index index.html index.htm;
        try_files $uri $uri/ /index.html;
    }
}
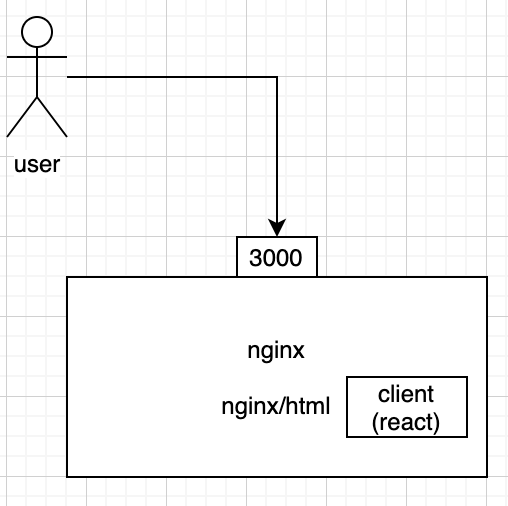
- Above is the nginx configuration for react client. React files can be served both as static files included in the api server, or they can have their own separate server for provision. The latter is when nginx is used. I make nginx server to listen to port 3000, set root to be where the output of build is located. Like the diagram below.
Dockerfile for server and worker (identical)
FROM node:alpine
WORKDIR '/app'
COPY ./package.json ./
RUN npm install
COPY . .
CMD ["npm", "run", "start"]
- Everything is pretty much the same (and simpler), but the last line ‘CMD [“npm”, “run”, “start”]’ needs explanation. CMD is a docker instruction that sets a default command, which is executed only when I run a container without any further specification. When docker runs a new command, this default command will be ignored.
Dockerfile for nginx
FROM nginx
COPY ./default.conf /etc/nginx/conf.d/default.conf
upstream client {
    server client:3000;
}
<!-- define client upstream -->

upstream api {
    server api:5000;
}
<!-- define api server upstream -->

server {
    listen 80;
    location / {
        proxy_pass http://client;
    }
    location /sockjs-node {
        proxy_pass http://client;
        proxy_http_version 1.1;
        proxy_set_header Upgrade $http_upgrade;
        proxy_set_header Connection "Upgrade";
    }
    location /api {
        rewrite /api/(.*) /$1 break;
        proxy_pass http://api;
    }
}
- This nginx server is set at the very frontline of the whole project, and listening to the port 80. It passes any request with url / to the react client server, and honestly I forgot about what /sockjs-node was supposed to do. It is a library that enables socket connection by node.js but hmm…
- nginx server redirects any url with /api to the api server. It translates, with regex, /api/* url to just /.
5-2. Setting Travis CI
sudo: required
#   specify docker as a dependecy
services:
  - docker

#    production dockerfile does not allow us to run tests!, so run as Dockerfile.dev
before_install:
  - docker build -t tlonist/react-test -f ./client/Dockerfile.dev ./client

#   makes test code exist by adding -- --coverage
script:
  - docker run tlonist/react-test npm test -- --coverage

#   build prod versions of docker
after_success:
  - docker build -t tlonist/multi-client ./client
  - docker build -t tlonist/multi-nginx ./nginx
  - docker build -t tlonist/multi-server ./server
  - docker build -t tlonist/multi-worker ./worker
#   login to Docker CLI
  - echo "$DOCKER_PASSWORD" | docker login -u "$DOCKER_ID" --password-stdin
#   push all to docker hub, by using encrypted private information entered in Travis
  - docker push tlonist/multi-client
  - docker push tlonist/multi-nginx
  - docker push tlonist/multi-server
  - docker push tlonist/multi-worker


#   tell elastic beanstalk to update
deploy:
  provider: elasticbeanstalk
  region: ap-northeast-2
  app: multi-docker
  env: MultiDocker-env-1
  bucket_name: elasticbeanstalk-ap-northeast-2-734004190163
  bucket_path: docker-multi
  on:
    branch: master
  access_key_id: $AWS_ACCESS_KEY
  secret_access_key: $AWS_SECRET_KEY
- What this .travis.yml file is doing is
- it runs tests in docker build -t tlonist/react-test
- runs docker files for building container images of each subparts of the Fibonacci calcualtor project
- pushes the individual images to docker hub
- tells elastic beanstalk to deploy the project with images.
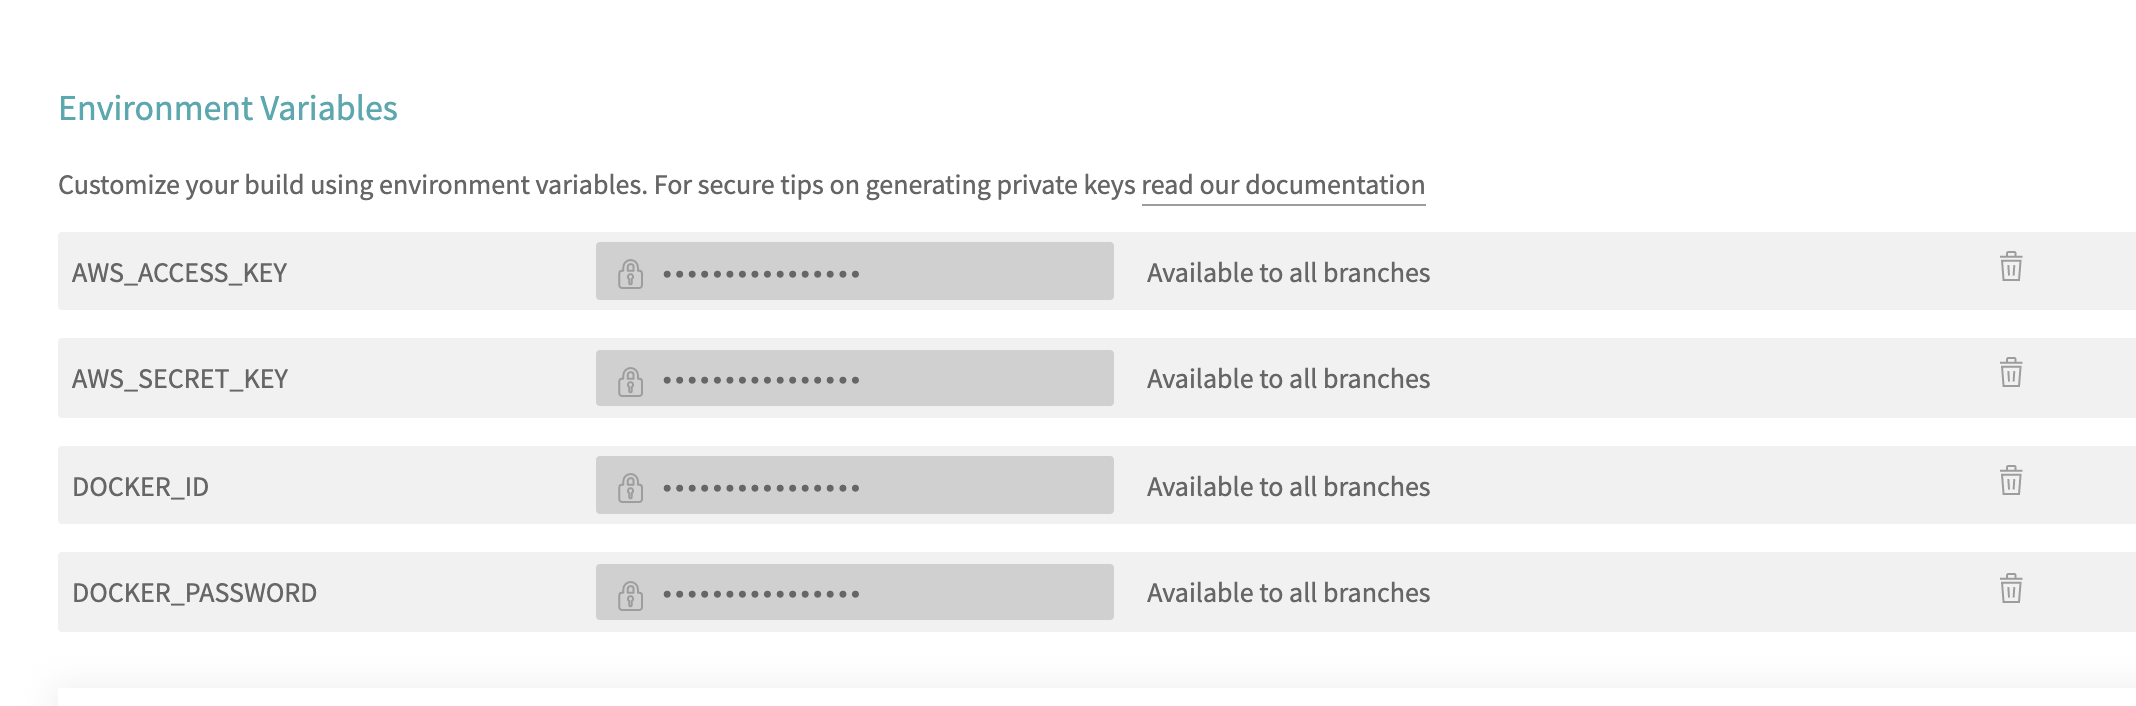
- I before doing above, I need to set environment variables from travis-ci.org, in Travis-CI settings like below.
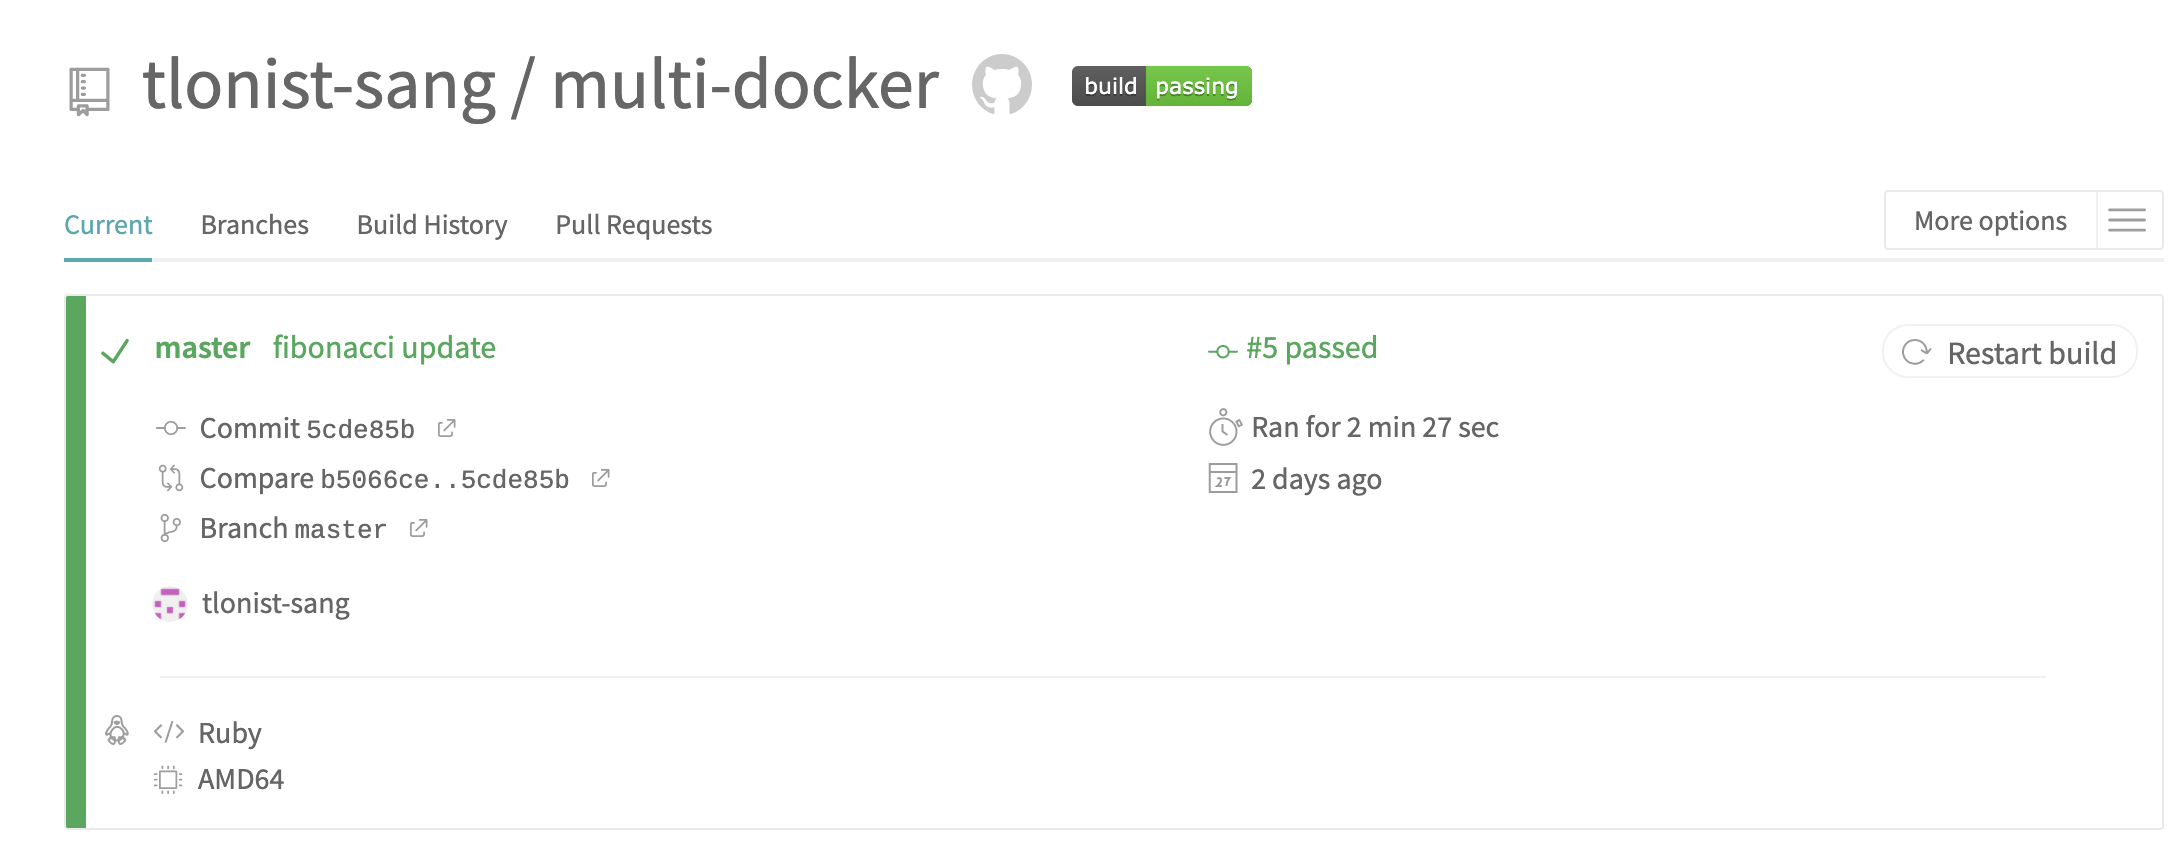
- After setting up travis-ci setting, let’s push everything so far - the codes, dockerfiles, configuration files and etc.. - to github master branch. If everyhitng works as planned, travis will automatically detect changes in the github repository, and will run test, build docker images, push the images to docker hub. For elastic beastalk part, I need little more configuration on AWS side to do.
5-3. Configuring AWS elastic beanstalk
{
  "AWSEBDockerrunVersion": 2,
  "containerDefinitions": [
    {
      "name": "client",
      "image": "tlonist/multi-client",
      "hostname": "client",
      "essential": false,
      "memory": 128
    },
    {
      "name": "server",
      "image": "tlonist/multi-server",
      "hostname": "api",
      "essential": false,
      "memory": 128
    },
    {
      "name": "worker",
      "image": "tlonist/multi-worker",
      "hostname": "worker",
      "essential": false,
      "memory": 128
    },
    {
      "name": "nginx",
      "image": "tlonist/multi-nginx",
      "hostname": "nginx",
      "essential": true,
      "portMappings": [
        {
          "hostPort": 80,
          "containerPort": 80
        }
      ],
      "links": ["client", "server"],
      "memory": 128
    }
  ]
}
-
When there is only one dockerfile, I didn’t need to do any configuration setting for elastic beanstalk, but in this multi-container environmet to run, I need to tell elastic search how to coordinate different containers for running the whole.
-
In the root directory of the project, make a json file for elastic beanstalk configuration. This file is somewhat similar to Docker-compose.yml in that it tells elastic beanstalk how to orchestrate many containers. For more information, let’s refer to official document.
A Dockerrun.aws.json file is an Elastic Beanstalk–specific JSON file that describes how to deploy a set of Docker containers as an Elastic Beanstalk application. You can use a Dockerrun.aws.json file for a multicontainer Docker environment.
Dockerrun.aws.json describes the containers to deploy to each container instance (Amazon EC2 instance that hosts Docker containers) in the environment as well as the data volumes to create on the host instance for the containers to mount.
A Dockerrun.aws.json file can be used on its own or zipped up with additional source code in a single archive. Source code that is archived with a Dockerrun.aws.json is deployed to Amazon EC2 container instances and accessible in the /var/app/current/ directory. Use the volumes section of the config to provide file volumes for the Docker containers running on the host instance. Use the mountPoints section of the embedded container definitions to map these volumes to mount points that applications on the Docker containers can use.
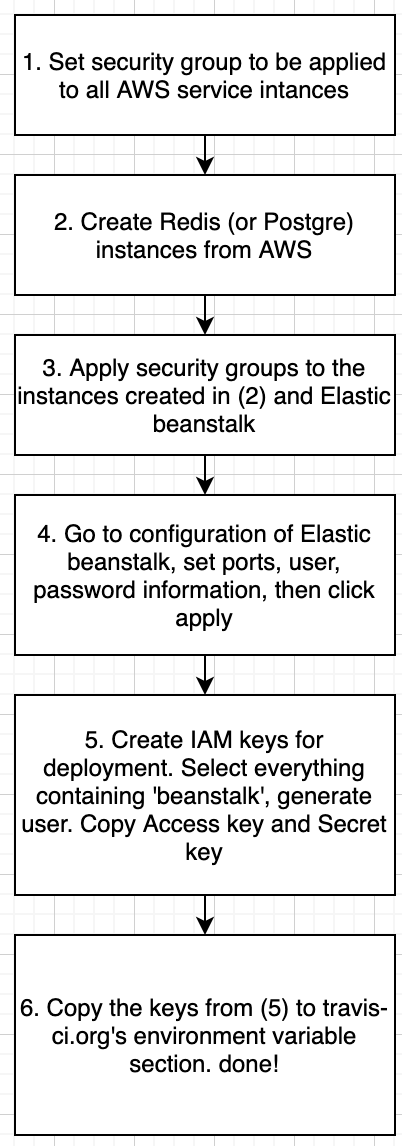
Configuring AWS elasticache and posrgres RDS
-
So far redis and postgres have been completely ignored. This is because I will actually NOT use docker containers for redis and postgres. Rather, I’ll use aws services straight from AWS.
-
Configuring AWS services for redis and postgre is not the scope of this posting, because it is a vendor specific, prone to change set of procedures that is not so worth chronicling. However, I will just briefly write the set of stuffs one needs to do to configure redis and postgre services and connect them to the elastic beanstalk instance I created.
- After all is done, I am ready to make changes to my local repository, and push it to the master!
Pushing to master branch
- I shifted the existing algorithm for calculating Fibonacci number to use memoization instead of just using recursion. Then pushing it to the master and waiting a little bit,
- D.O.N.E.
Conclusion
- It was a pretty long post, and I had to finish it hurridely to minimize the money being spent on my running elastic beanstalk instance. In this posting I traced the process of deploying a multi-container project to elastic beanstalk, implementing a whole CI/CD chain. This of course needs a lot, a lot of tuning, but at least by reviewing the process I got to see a bigger picture of how the pipeline is established. I also went over some key concepts like containers, grammars of dockerfile and configuration and etc. Hope this can provide me and some a rough reference!